When students open a Canvas course, they need to know where they are and what is expected of them. In the PANDA framework (Prepare, Activate, Navigate, Demonstrate, Articulate), the first element does that job. This post is part of the PANDA series, so start with the Introduction to the PANDA Framework if you are new to it.
Learning outcomes
By the end of this post you’ll be able to
- Explain why a Prepare page helps students at the start of each week.
- Design a Prepare page with an overview, outcomes, tasks and criteria.
- Apply the Canvas steps to build and test one.
Why Prepare matters
A classroom session starts by setting the scene: you welcome people, explain the plan and mention what they need. Online learners deserve the same, but nobody is in the room to say it. Prepare does that work in writing.
Done well, it means students know what the week involves before they start, which cuts avoidable questions. The structure repeats weekly, so they learn where to look. It also helps anyone who joins late, returns after an absence or studies part time.
Case study
From a long welcome page to a short Prepare page
Illustrative example
The context
A lecturer teaches a first-year module at a UK university, with a weekly module in Canvas.
The challenge
Each week began with a long page repeating the syllabus. Students kept asking what to do first and when work was due.
What they did
The lecturer rewrote the Week 4 page as a short overview, three outcomes, a list of tasks with times and deadlines and a link to the criteria. They named it “Prepare: Week 4”, placed it first in the module and copied the structure for later weeks.
What happened
Questions about what to do first tailed off, and each new week took only a few minutes to set up.
What would you do?
- What on your first page of the week could move to a later element?
- How would a student who joined late find out what the week involves?
What belongs in Prepare
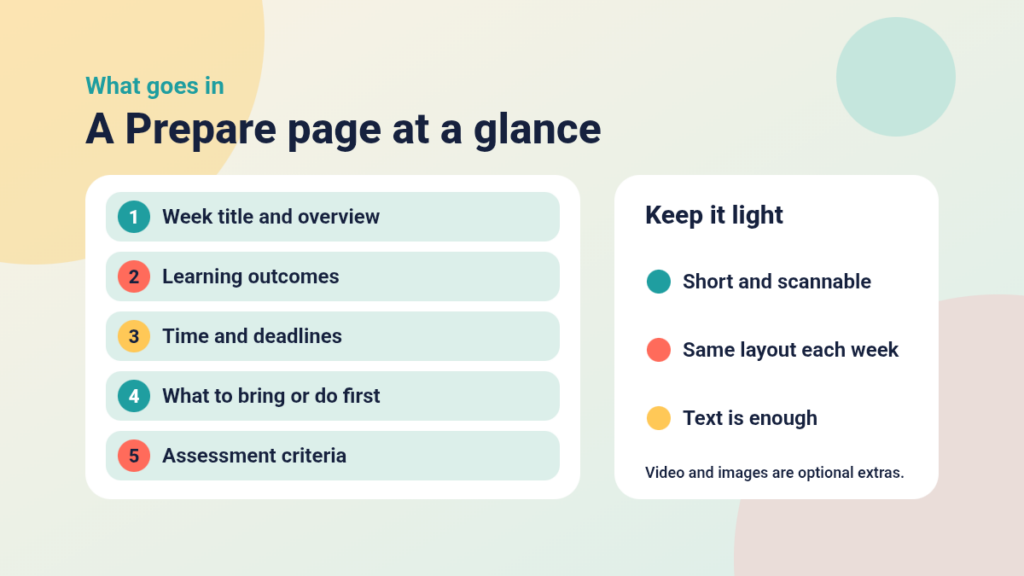
A short overview and the outcomes
Explain in a few sentences what the week covers and how it follows the last. Then list the outcomes in plain language, so students can read them and know what they will be able to do by the end.
Expectations, time and deadlines
Say what students should do and roughly how long it takes. Note deadlines and where the tasks are. If there is a live session, mention it so that online and face-to-face teaching feel connected.
What to bring or do beforehand
List any readings, software to install or questions to think about first. Placing them here means students are not surprised later.
Criteria and ground rules
If students complete a task this week, link to the criteria so they know what good work looks like. This is also the place for ground rules, such as expectations for discussion boards or how to ask for help.
Try it yourself
Does it belong in Prepare?
Read each item and decide whether it belongs on the Prepare page or in a later element. This is my reading of PANDA, and some items could be argued either way.
Building Prepare in Canvas
- Use a Page. Headings, lists and links keep it tidy. For more on layout, see Tips and Tricks for Better Canvas Wiki Page Design.
- Name it consistently. A label such as “Prepare: Week 4” lets students spot the element straight away.
- Place it first in the module. It then matches the order in which students should work. Driving Canvas: Modules vs Pages explains why modules suit this.
- Reuse the structure. Duplicate your module or its items where Canvas allows it, then replace the content for the new week.
- Add a requirement. A “view” or “mark as done” requirement encourages students to read it before moving on.
Try it yourself
Build a Prepare page in order
Put the steps for building a Prepare page in Canvas into a sensible order. Use the arrows to move a step.
A sample Prepare page
Put together, the five parts above make a page that fits on one screen: an overview, outcomes, tasks with times and deadlines, anything to do first and a link to the criteria. Once you have written it for one week, it becomes a template you can copy in minutes.
Put it into practice
Your turn
Draft the Prepare page for your next week using the five parts above. Keep it to what a student can read in about two minutes.
Keep it light
It is tempting to put everything in Prepare, but it works best when brief. Text is often enough, with a few short headings to make it easy to scan. A short welcome video or image is an optional extra, not a replacement for the written information. Add captions or a transcript to any video so that everyone can access it.
Common mistakes to avoid
- Repeating the whole syllabus instead of focusing on the week.
- Writing long paragraphs that students are unlikely to read.
- Changing the layout from week to week.
- Leaving out deadlines or where to find the work.
Test it as a student
Before you publish, switch to Student View and read the page as a newcomer would. Ask whether you could explain the week’s tasks in a minute after reading it. If not, trim the content or move detail to a later element.
Where to go next
A clear Prepare page makes the next element easier. Once students know what to expect, Activate can draw them into the topic. Preparing & Activating continues from here.
Check your understanding
Knowledge check
Name three things that belong on a Prepare page.
An overview, outcomes and tasks with times and deadlines. Together they let students plan their week.
A colleague wants to put a 30-minute lecture video on the Prepare page. What would you suggest?
Move it to Navigate. Prepare should stay brief and only say what is coming.
How can you check a Prepare page works before you publish it?
Read it in Student View and see whether you could explain the week’s tasks in a minute.
Remember
Key takeaways
- Prepare sets the scene for each week, in writing, before students start.
- Include an overview, outcomes, tasks with times and deadlines, anything to do first and the criteria.
- Keep it short, consistent and first in the module.
- Test it in Student View before you publish.
Your next step
This week, write the Prepare page for one upcoming week using the structure above, and read it in Student View. Afterwards, notice which questions about the week you no longer get.
Reflect: what does a student currently have to work out for themselves when your week begins?
Keep going
Introduction to the PANDA Framework
PANDA gives every week of an online course the same five-part structure: Prepare, Activate, Navigate, Demonstrate and Articulate. Here is how it works and how to build it in Canvas.

One Page vs Pre-In-Post vs PANDA: Choosing a Structure for Your Canvas Week
A one-page week, Pre-In-Post and PANDA each shape how students meet your content. This post compares their strengths and limits and shows how to choose and move between them in Canvas.

Connecting PANDA with Gagné and Bloom’s Taxonomy
See how the PANDA framework lines up with Gagné's nine events of instruction and Bloom's taxonomy, and how to build course sites in Canvas where structure, outcomes and tasks align.